Beneath the ocean between Temuair and Medenia, lies a sunken pirate ship. In the heart of the ship, carries treasure is large that it is beyond the realm's comprehension. Tragedy struck upon the ship, sending her deep below the ocean bed. No one knows what happened, but everyone knows of it's treasures. Treasure hunters and pirates alike, seeked to obtain the treasure, none but one returned to tell the tales of this sunken ship.
An ex-pirate is often seen working around the Loures Harbor Shop. He was the only one whom survived the tragegic horrors of this haunted ship. He do believe that the treasure is real. A giant pearl can be found in a clam. But the ship was heavily guarded with traps and sea creatures. The presence of this ship is hidden away. The only way to enter the ship is by obtaining a tablet piece, that has been scattered throughout the ocean floor.
Requirements[]
- Breathe Ring
- Tablet Piece 1
- Medenia Ferry Ticket
Obtaining Tablets[]
You are required to have 4 broken tablet pieces before entering Unknown Depths 14. Entering into Unknown Depths 14a, all 4 pieces will merge into a complete tablet. If you accidentally leave 14a, you will need to obtain all the parts of the tablets again. Tablet 1 can only be obtained in Temuair. If you attempt to enter Unknown Depths 14a without all 4 pieces, you will be brought to 14b, where the ship don't exist.
Since you need all 4 parts, you do not need to do accordingly. Here is what I recommend:
- Tablet Piece 1
- Tablet Piece 4
- Tablet Piece 2
- Tablet Piece 3
Tablet Piece 1[]
Obtained by speaking with the pirate found in the room further into Loures Harbor Shop 2. Speak with the pirate in this manner:
- Hello
- Hello
- Where?
- Who are you?
- I am <name>
- sits
- What happened?
- Sure
After this conversation, he will give you the first piece.
Tablet Piece 2[]
Obtained by going to the room in Unknown Depths 9, and say:
- Tablet
- Seafood
- Give either Starfish arm from Green Starfish
- Give either Tentacles from Green Octopus
These items are dropped in most of the rooms. Most of the Starfish can be found in Unknown Depths 11, and Octopus can be found in Unknown Depths 13.
Tablet Piece 3[]
Obtained by going to Unknown Depths 12 and say:
- Tablet
Tablet Piece 4[]
Obtained by going to Unknown Depths 8, to the top left corner and find an skeleton pirate named Donn, and say:
- Tablet
- Burgess
- Seagull
- Propose
After hearing the extremely long romance-cum-comedy, and answer everything correctly, he will give you a tablet piece.
Puzzles and Traps[]
From this point onwards, it's no turning back. Literally. You are required to obtain keys to the locked doors in this ship.
First Floor[]
Objective: Obtain Ship Key 6
Steps as follows:
- Kill all aggressive eels in room 1-1 for ship key 1 and room 1-2 for ship key 2.
- Kill all aggressive eels but avoid touching the love eels
- Love eels hits once with some hearts and swims away. If you hit a love eel, you will be ported out and require the respective key to enter
- Get key 3 in room 1-3, key 4 in room 1-4 and key 5 in room 1-5.
- Kill eel in Room 1-6. There is only 1 eel and it spawns once a minute. Take the Ship Key 6 to the next floor.
In room 1-6, it becomes a bottle neck if you are attempting the quest in large groups.
Hints and Suggestions[]
- Rooms 1-3 to 1-5 is annoying when you accidentally hit the love eels, since all the eels will swamp towards you all at the same time. Athar lamh is something you don't want to cast, because if you hit a love eel, you get ported out. Deo Searg Gar works fine in there. It massively clears everything, dropping the keys.
- If you are attempting this in a larger group, these are some suggestions to speed the quest
- Once Aisling A obtained Ship Key 5, have him enter room 1-6 to obtain Ship Key 6. When Aisling B obtained Ship Key 5, he takes over Aisling A and hunt for the rest of the keys, while Aisling A move up to Floor 2, so on.
- Each time an Aisling receives Ship Key 6, he moves to the second floor to solve the puzzles. The first person who went up have to solve the puzzle twice and give the key to the last Aisling who remained in the first floor who's collecting Ship Key 6.
Second Floor[]
Objective: Obtain Ship Key 12.
Steps as follows:
| Rooms | Directions |
| 2-1 | Left, Right, Right |
| 2-2 | Up, Down, Left |
| 2-3 | Left, Right, Left, Down |
| 2-4 | Right, Up, Down, Left, Up |
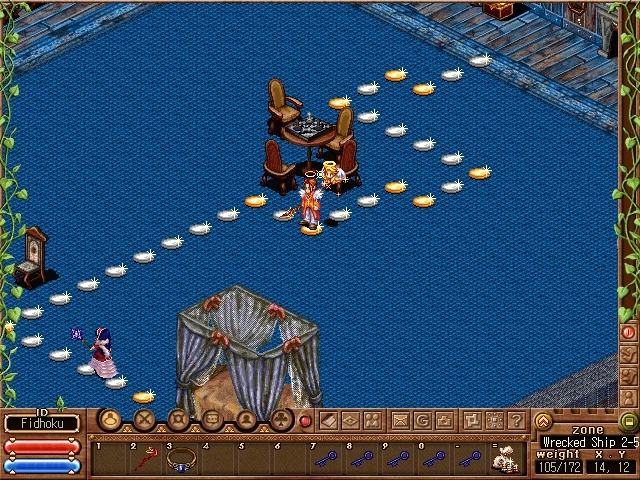
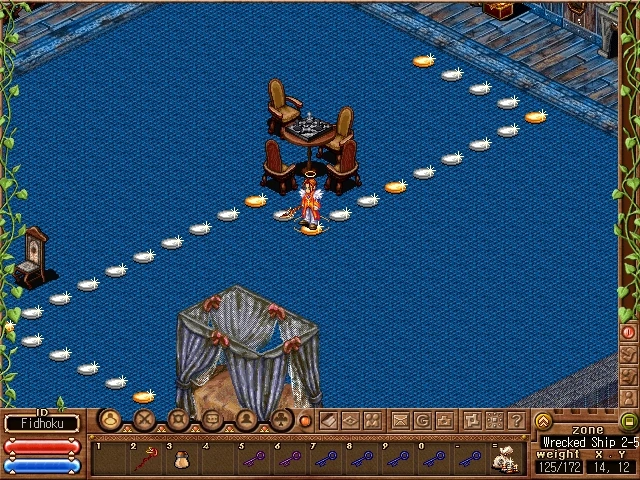
- Rooms 2-5 is a booby trap room. When you step on the trap, it ports you back to the door. CAUTION: If done in a large group, avoid clustering at the door or you get 'sucked' out. There are several solutions to this trap. The chest is located near 0, 10. Here are some possible solutions
- ** The solution may change, however, these are 2 which I've discovered.
2. Use Ship Key 10 obtained in room 2-5 to enter 2-6. The solution for this puzzle is very simple. Steps as follows:
|
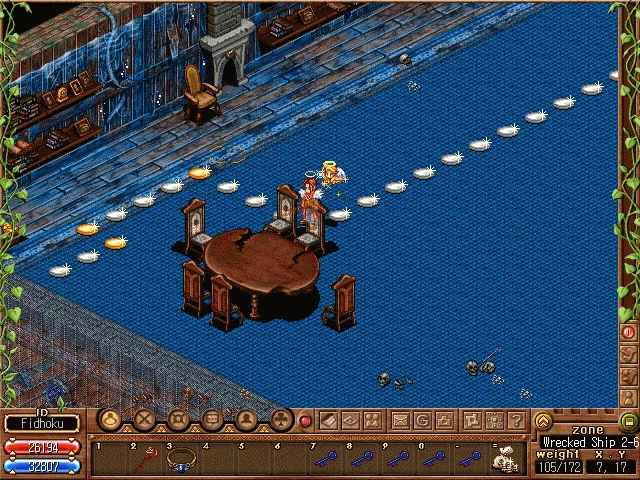 Solution |
Third Floor[]
Objective: Obtain Ship Key 18.
This is by far the simplest floor. You need to need beside a chest and assail or cast a spell to open the chest. You will receive either of the following:
- 1,000 gold
- 5,000k damage through dion
- Key to the next room
- Nothing
That's it! Nothing thrilling nor difficult to handle.
Forth Floor[]
Objective: Obtain Ship Key 23
From here onwards, you will need to fight your way through and obtain the keys. This level roams sea skrulls in the various rooms. The sea skulls may drop the key. They attack hard and quick with elemental attack and defense, and with the ability to cast ao sith on the attacker. They can ao ard cradh themselves, so Dark Seal would be very effective here.
Hints and Suggestions[]
- Have a Priest/Bard to cast suain/mesmerize. Once immobile, cast ard cradh/dark seal on them. Have a basher wearing Dark Necklace and attack them. They die in several hits depending on the damage dealt.
- Have a Priest to cast breileisch, a confused spell on the sea skrulls. When the skrulls see another, it may attack it. They would cast spells on each other, and watch them fight. They stop when either one or both have almost no HP left. Suain it and get a Wizard to PND them. It takes usually one hit.
Fifth Floor[]
Objective: Obtain Ship Key 29
Similar to Forth floor, this time, it is skeleton warriors. You may repeat the suggested solution mentioned above. Here are the steps as follows:
- Clear rooms 5-1 to 5-4 and obtain the key to the next.
- When arrived in room 5-4, hunt for just a key.
- Have 1 Aisling to enter room 5-5 and attack the pirates in this order:
- Skinny
- Fat
- Short
- Everyone in the same group should receive Ship Key 28. If not, the person who did not receive the key, should use Ship Key 27 and attack the pirates
- Once obtained Ship Key 28, move to room 5-5 and say: "AARRGG" and your final key is given to you.
- With Ship Key 29, you may now approach room 5-6.
You will see a huge purple-looking mermaid in giant clam, surrounded in tons of treasure chests. You have a final conversation before you can conclude the end of the quest. Speak this accordingly:
- Maryla
- Donn
- He is Dead
- He will always love you
Choosing your Ores[]
This is the most important part. You are given only 1 chance to select. After you decide, you can't change or "re-select". Depending on your class, you will receive either a selection of ores, or only one. These classes will receive the following:
Priest / Warrior
- Sapphire
- Emerald
- Ruby
- Amber
- Diamond
Monk
- Emerald
- Sapphire
Rogue
- Ruby
Wizard
- Emerald
Crafting Gem Weapon[]
First, you need to decide which weapon or equipment you wish to craft. Once you have decided, bring the ore that you wish to craft your from into. Eg. Warriors would bring a Ruby Ore to craft a Ruby Sabre. Take the Ferry to Medenia and jump over board with the breathe ring worn. Make your way to Unknown Depths 12, into the room. Speak to the Mundane and Select the option "Gem Weapon".
You have finally crafted your item! This can only be done once a Deoch. So choose well!